
Ahora que hace calorcito y apetece recogerse el pelo, o para las que como yo estan en fase de crecimiento y algunos van hacia la derecha y otros hacia la izquierda... No tendréis que preocuparos de atar el pañuelo cada vez que lo queráis llevar y evitareís el horrible nudo en la nuca.
Es sencillisima de hacer, mañana voy a comprar tela y en cuanto la haga os cuelgo foto.
_______ _______
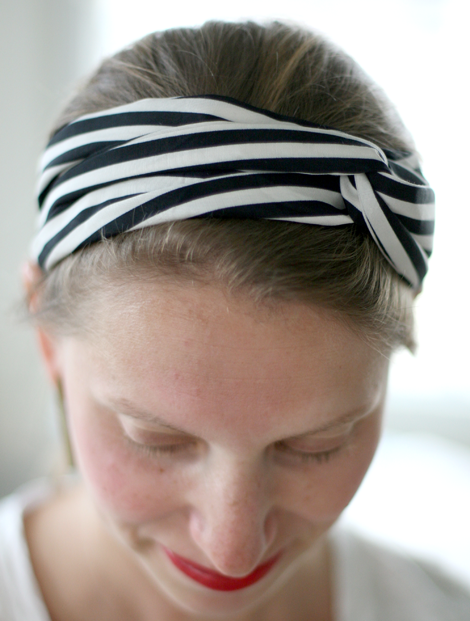
Oh Yes! I found the ideal headband with the ideal fabric! Like a turban but attached to the rear by a snap fastener.
Now that's hot and we want hair up, or for those who like me are in growth phase and some are going right and others left ... You will not have to worry about tying the scarf whenever youwish to wear it and you will avoid the ugly knot at the nape.
It is very simple to do, tomorrow I am going to buy fabric and as soon as I will make it I will post a photo.


Cortar 4 trozos como los de la imagen (más o menos). Hay que medirse la cabeza por donde quieras usar el pañuelo como diadema y añadir aproximadameente 2 cm. (a mi me salen unos 56+2 cm). Siempre será mejor equivocarse de más que de menos.
Coser las piezas entre sí por el reves, dejando un agujero de alrededor de 1 cm para poder girar el tejido. Una vez dada la vuelta hay que coser sin que se note la parte que hemos dejado abierta. Cuando se tienen las dos bandas hechas hay que plancharlas para que queden bien planas.
Cruzar las bandas, doblarlas sobre ellas mismas y coser los extremos y coser el boton automatico.
Lista para llevar!!
_______ _______
Cut 4 pieces like the image (more or less). Head should be measured by where you want to use the scarf as headband and add about 2 cm. (my I get a 56 +2cm). Is always better to err of over than less.
Sew the pieces together at the back, leaving a hole about 1 cm to spin the fabric. Once turn them you must sew the part that we have left open. When you have made the two bands they have to be iron so they remain flat.
Crossing bands, fold in on themselves, sew the ends and sew the button automatic.
Ready to go!
¡Me encanta! a ver si soy capaz de hacerla....
ReplyDelete