Hace algun tiempo había "postado" (del verbo postar ^___^) un peinado desde el blog de Joanna Goddard y hoy os dejo otro ejemplo.
Me gusta por que es sencillo de hacer y aunque yo tenga que esperar al menos un par de años para poderme permitir una cosa parecida no quiere decir que las melenudas que lean mi blog no puedan utilizar sus trucos.
_______ _______
You know my obsession with long hair, especially by the mine.
Some time ago, I posted a hairstyle from Joanna Goddard's blog and today I leave you another example.
I like it because it is simple to do and although I have to wait at least a couple of years to could allow something like that does not mean that the hairy who read my blog can not use their tips.
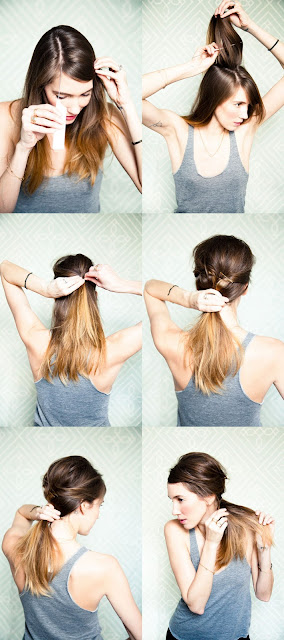
1. Hacerlo con el pelo de un día... lo que significa que ha pasado un día desde que lo has lavado. (Si debes lavar el pelo, luego puedes utilizar un spray para dar volumen. Y si tu cabello es graso, usa un champú seco para construir el cuerpo y la textura). Ahora hazte una raya lateral, puedes usar un peine con una pua metalica para obtener una raya recta.
2. Cardar el ultimo cuarto de la parte alta del pelo. Basicamente debes cepillar el pelo hacia abajo hasta que quede de pie por si mismo.
3. Cepilla suavemente una capa de tu cabello para que sea suave en la parte superior. El cardado se debe ocultar debajo de esta capa. Ten en cuenta que no debes cepillarlo demasiado liso, lo que se desea es un efecto desordenado.
4. Recoge toda la seccion del cardado y fijalo en la parte de atras de la cabeza con algunas horquillas formando una "X"
5. Recoge todo el pelo en una cola baja. Apretar la goma de pelo al maximo, esto te ayuda a "empujar" el pelo hacia arriba creando más volumen en la parte superior.
5. Puedes dejar la goma expuesta o ocultarla cogiendo un mechon de pelo de la cola y envolviendolo alrededor de la goma fijandolo con una horquilla..
6. Despeina la cola con los dedos para que se parezca a la de la parte superior de la cabeza haciendo el mismo movimiento de abajo a rriba. Recuerda, este peinado no busca la perfección, se ve mejor un poco despeinado.
_______ _______
1. Start with day-old hair...meaning it's been a day since you've washed it. (If you must wash your hair, then use a volumizing spray to add oomf; and if your hair is oily, use a French dry shampoo to build body and texture.) Now make a deep side part on one side of your hair. You can use a rat-tail comb to get an extra straight part.
2. Backcomb the top quarter of your hair. Basically, brush the hair downwards toward your scalp so it's sort of frizzy and can stand on its own.
3. Gently brush the very top layer of your hair to make it smooth on the top. That way, all the backcombing will be hidden under the layer that you brushed. Still, don't brush too much, you want it a little messy.
4. Take the entire backcombed section and pin it behind your head. To make it secure, place the bobby pins in an "X."
5. Now take all your hair and put it in a low ponytail at the nape of your neck. Tighten the rubber band as tight as you can. This will help "push" your hair up, creating more volume at the top.
5. You can either leave the rubber band exposed, or hide it by taking a small half-inch section of hair from the ponytail and wrapping it around the rubber band. Take a small bobby pin and pin the hair to the rubber band.
6. Rough up the ponytail with your fingers to match the texture at the top of your hair. Use the same motion as you did to back comb, but use your fingers instead, since this will create a messy texture but will be softer and gentler than using a comb. Remember, this look isn't about perfection; it looks best slightly messy.
Via A Cup of Jo
(Photos by Jamie Beck. Caroline's lip color is Covergirl Outlast Lipstain in Plum Pout.)


No comments:
Post a Comment